
We have already talked about Amazon Cognito in our previous blog where our focus was fine-grained Role-Based Access Control (RBAC) in Cognito Federated Identities. In this blog our focus will be Amazon Cognito User pool, process of sign in and secured access to the back-end API’s endpoints using OAuth 2.0 authorization flow. We want to implement following high level flow:

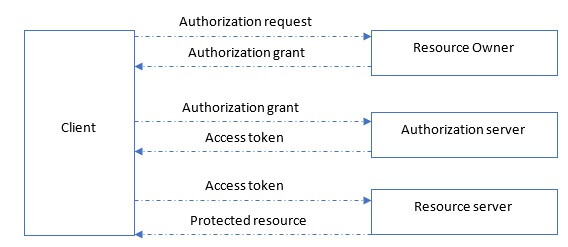
By definition, the OAuth 2.0 authorization framework enables a third-party application to obtain limited access to an HTTP service, either on behalf of a resource owner by orchestrating an approval interaction between the resource owner and the HTTP service, or by allowing the third-party application to obtain access on its own behalf.
OAuth 2.0 defines four roles and here is the protocol flow (more info about OAuth 2.0):
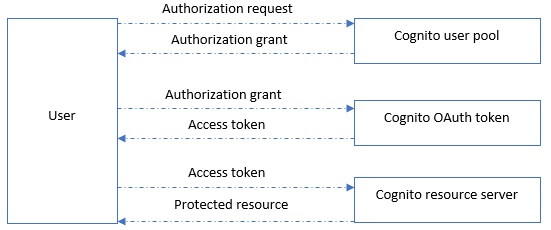
OAuth 2.0 flow is completely supported by Amazon Cognito:
Let’s go steps by step and implement the flow.
Create User pool
Create one User pool and create several users by entering their required attributes. More about sign up and sign in users in Cognito can be found under blog Cognito User Pool – Sign in, Register and Sign Up user process.
Create App client
While you create a user pool, the Amazon Cognito console displays an App integration tab where you can configure settings for the customizable, built-in UI for signing up and signing in users. Also, you can access App clients from User pool main menu. Create one App that have enabled secret key and enabled sign-in API for server-based authentication (ADMIN_NO_SRP_AUTH). ADMIN_NO_SRP_AUTH is used when your app is a server app that requires developer credentials (using Signature Version 4) and doesn’t use Secure Remote Protocol (SRP) authentication.
Register Domain name
Congito hosts out of the box UI page for sing up and sign in. Under domain name section you can register domain where this UI form can be accessed.
Create Resource server
We want to support custom scopes for OAuth2.0 flow. Let’s create one Resource server. From main User pool menu, choose Resource servers and add new one.
A resource server is a server for access-protected resources, in this case APIs in the back-end. It handles authenticated requests from an app that has an access token. Typically, the resource server provides a CRUDL API for making these access requests. As a senior AWS engineer you know that this API can be hosted on Amazon API Gateway or outside of AWS. Amazon API Gateway custom authorizer is a good option for inspecting access tokens, protecting your resources, verify the access token signature and expiration date before processing any claims inside the token.
A scope is a level of access that an app can request to a resource. For example, if you have a resource server for books, it might define two scopes: one for read access to the books and one for write/delete access. When the app makes an API call to request access and passes an access token, the token will have one or more scopes embedded in inside it.
Amazon Cognito allows app developers to create their own OAuth2.0 resource servers and define custom scopes in them. Custom scopes can then be associated with a client, and the client can request them in OAuth2.0 authorization code grant flow, implicit flow, and client credentials flow. Custom scopes are added in the scope claim in the access token. We will elaborate Oauth2.0 flow with authorization code grant.
Register your App client with the Resource server. Define your callback URLs and allowed scopes for the App.
Get authorization code and Exchange it for access and refresh token
An OAuth 2.0 server implementation of the authorization code flow consists of two endpoints, which your service makes available by HTTPS. The first endpoint is the authorization endpoint, which is responsible for finding or obtaining consent from users for data access. The authorization endpoint presents sign-in UI to your users that aren’t already signed in and records consent to the requested access. As a result, from this endpoint is authorization code.
In this flow, after you create a resource server and define custom scopes, you can open sign up/sign in form from the domain that you have registered earlier. You can view the hosted UI with your customizations by constructing the following URL, with the specifics for your user pool, and typing it into a browser:
GET https://<custom_domain>/login?response_type=code&client_id=<app_client_id>&redirect_uri=<callback_url>.
Your domain is shown on the Domain name tab. Your app client ID and callback URL are shown on the App client settings tab.
After providing valid username and password, response will contain Authorization code:
https://<callback _url>?code=xxxxxxxx-xxxx-xxxx-xxxx-xxxxxxxxxxxx&state=STATE
This code will be exchanged for access token in order to securely access backend resources. More about Cognito authorization endpoint can be found in AWS documentation.
The second endpoint is the token exchange endpoint, which is used to exchange encrypted strings for different kinds of tokens. These tokens are passed to back-end service to access content.
Amazon Cognito provides TOKEN endpoint.
In our case, it can be accessed on following endpoint:
POST https://<custom_domain>.auth.us-east-1.amazoncognito.com/oauth2/token
with header parameters:
- Authorization: Basic Base64Encode(client_id:client_secret).
- Content-type: application/x-www-form-urlencoded
And body parameters:
- grant_type: authorization_code
- client_id: <app client id>
- scope: none or some of the custom one’s
- redirect_uri: <redirect_usr>
- code: <authorization_code>
As a result, you will get:
———————————————
HTTP/1.1 200 OK
Content-Type: application/json
{
 "access_token":"<access_token>",
 "refresh_token":"<refresh_token>",
 "token_type":"Bearer",
 "expires_in":3600
}
———————————————-
You can use Refresh token in order to get new access token after the current one expires. Here is the approach:
POST URL: https://<custom_domain>.auth.us-east-1.amazoncognito.com/oauth2/token
with header parameters:
- Authorization: Basic Base64Encode(client_id:client_secret).
- Content-type: application/x-www-form-urlencoded
And body parameters:
- grant_type: refresh_token
- client_id: <app client id>
- refresh_token: <refresh_token>
As a result, you will get:
———————————————–
HTTP/1.1 200 OK
Content-Type: application/json
{
 "access_token":"<access_token>",
 "token_type":"Bearer",
 "expires_in":3600
}
———————————————–
Access token is JWT token that can be decoded and inside you can see following format of data:
{
"id": "<id>",
"jti": "<jti code>",
"iss": "issuer_id",
"aud": "client_id",
"sub": "user_id",
"exp": 1483711650,
"iat": 1483708050,
"token_type": "bearer",
"scope": "onescope twoscope"
}
Hope we helped to understand and implement OAuth 2.0 flow with Amazon Cognito.