
A typical day of a Laravel or a Node.js developer may be somewhat different, but a typical day of a .NET developer includes creating Web API services by using some of the most popular frameworks. What should we do with the documentation created in the process, how do we create something useful for developers who might need to use our services? There are two ways to create this type of documentation, One of course is the manual way, and thus hard to keep it perfectly synchronized with the API, and the second and simpler way of creating the documentation is from the code itself by using Swagger or Asp.Net Web API help pages and etc.
Swagger is a framework for describing our API using a common language that everyone can understand. There are two ways to use this framework, the first approach is to create the design without creating any code and the second approach is when we have an API code ready, but we need to add a certain specification for the future use of the API functionalities. In this example, we will look at the code first approach, but it does not mean that part of the same concept can not be used for a different approach.
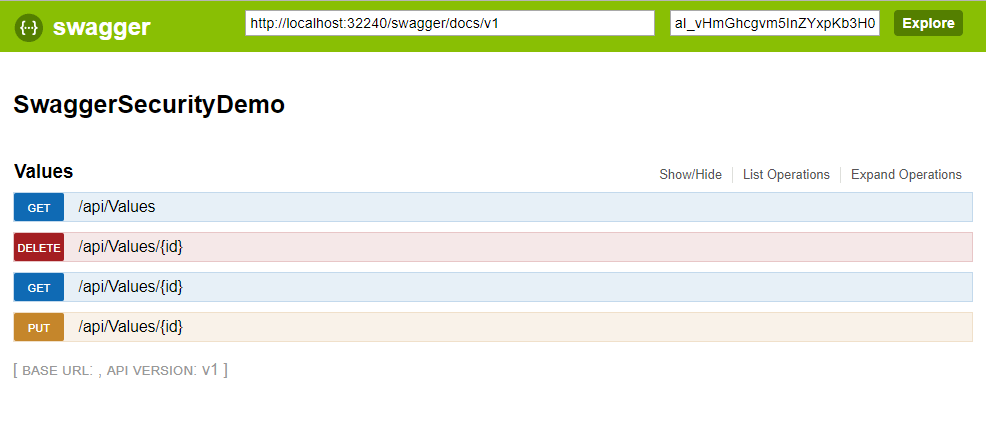
When it comes to corporate projects, this kind of specification should be available only to a certain group of developers, but the Swagger framework in the default settings does not give this kind of protection. If by installing Swagger we have already done authorization and authentication of our Web API methods, through Swagger UI we can see that not every request we try is authorized, so what can we do?
Authenticate your users to use Swagger UI
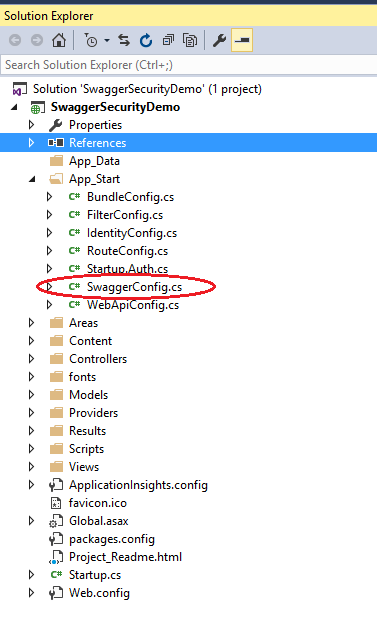
In order to know how to secure Swagger UI, we have to start from the beginning. So, after installing the Swashbuckle Nuget package to your Web API project you will notice a new file called SwaggerConfig.cs under the App_Start folder.
The initial SwaggerConfig class contains one static method where we should register configuration dependencies and it looks similar to the following code with a lot of commented code inside.
public static void Register()
{
    var thisAssembly = typeof(SwaggerConfig).Assembly;

    GlobalConfiguration.Configuration
        .EnableSwagger(c =>
         {
             c.SingleApiVersion("v1", "SwaggerSecurityDemo");
         })
       .EnableSwaggerUi(c =>
        {
        });
}
In addition, if we look in the commented code, we can see a lot of configuration code, and Swagger configuration for individual users’ authorization, registered to our Web API, is not present. For that purpose, we can create a custom authorization service with JavaScript, CSS, and HTML by enabling them in.EnableSwaggerUi(c=>{}) expression in the Register method.
Prior to this make sure you create a new folder named CustomSwagger and add an HTML file in the folder with the name swagger/index.html, a JavaScript file named Auth.js, and a CSS file with name custom.css. You can copy the content from the UI when you navigate to your Web API project /swagger, by using browser developer tools. Make sure that you copy all HTML code from the index into the newly created index.html file.
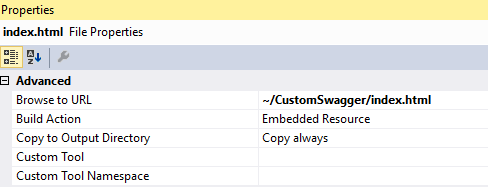
After copying the content make a right click on the index.html file and set it up like an embedded resource making sure that the file will be always copied. Also for the purpose of the Swagger UI login, we can add a new HTML file named login.html as the index.html registered in the configuration method and marked as an embedded resource, which must be set as copy always.
In addition, we must register the configuration expression, so the register method looks like this:
public static void Register()
{
    var thisAssembly = typeof(SwaggerConfig).Assembly;

    GlobalConfiguration.Configuration
        .EnableSwagger(c =>
            {
                c.SingleApiVersion("v1", "SwaggerSecurityDemo");
                c.BasicAuth("basic").Description("Basic HTTP Authentication");
            })
        .EnableSwaggerUi(c =>
            {
                c.InjectJavaScript(thisAssembly, "SwaggerSecurityDemo.CustomSwagger.Auth.js");
                c.CustomAsset("index", thisAssembly, "SwaggerSecurityDemo.CustomSwagger.index.html");
                c.CustomAsset("login", thisAssembly, "SwaggerSecurityDemo.CustomSwagger.login.html");
                c.EnableApiKeySupport("apiKey", "header");
            });
}
Due to the static value of the variable “curl” we received from copying, we must make some changes in the script section of the index.html file in order to configure the real path of JSON data which is provided by the Swagger itself. So, add the following code at the beginning of the script section, and on the configuration variable (window.swashbuckleConfig) assign the new “curl” variable to the parameter rootUrl.
var getUrl = window.location;
var splitedUrl = getUrl.pathname.split('/');
var curl = getUrl.protocol + "//" + getUrl.host + "/" + splitedUrl[0];
for (i = 1; i < splitedUrl.length; i++) {
    if (splitedUrl[i].toLowerCase() != "index" && splitedUrl[i].toLowerCase() != "ui") {
        curl += splitedUrl[i] + "/";
    }
}
curl = curl.slice(0, -1);

window.swashbuckleConfig = {
                rootUrl: curl,
.........................................................
After the initial Swagger setup of the index file, we can go on with the login form and the authentication token from the web API itself, now we can see that we have two HTML files where the main Swagger API documentation is on the /swagger/ui/index route and the login route is on the /swagger/ui/login. For authorization purposes, we can add a user authentication checkup in the index file in the section script at the bottom of the script, where we will check the token itself and its expiration. If the token is valid than we can assign its value to the input_apiKey field and we can tell the Swagger that we have a valid API communication token.
var token = sessionStorage.getItem("token");
var expires = sessionStorage.getItem("expires") !== null ?
new Date(sessionStorage.getItem("expires")) :
new Date(Date.now() - 86400000);
var now = new Date();
if ((!(token)) || (expires < now)) {
window.location.href = curl + "/ui" + "/login";
} else {
$('#input_apiKey').val(token);
addApiKeyAuthorization()
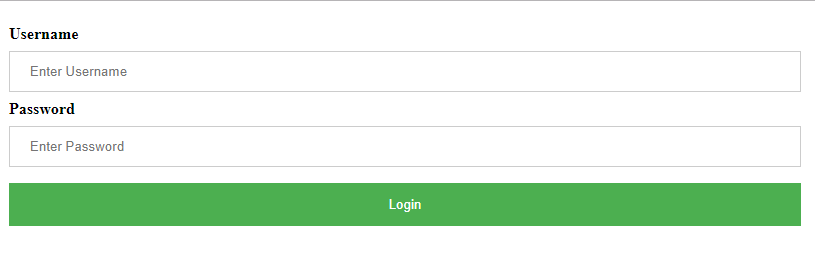
}The Swagger login page can contain a simple Swagger UI login page form and a JavaScript logic, which will communicate with the token endpoint of the API. The script itself can be contained in the Auth.js file, which is a part of the CustomSwagger folder, and we can add it with the following line of code:
<script src='lib/jquery-1-8-0-min-js' type='text/javascript'></script>
<script type="text/javascript" src="../../CustomSwagger/Auth.js"></script>
If we want to use jQuery we can also add it from the lib folder which is exposed from the Swagger itself.
The Auth.js logic should be the same as the one that announces the users in the real application and after the successful validation of the valid token, it will be redirected to the /index. Please keep in mind to get the right path to the generation token at the end.
$(function () {
    var getUrl = window.location;
    var splitedUrl = getUrl.pathname.split('/');
    var tUrl = getUrl.protocol + "//" + getUrl.host + "/" + splitedUrl[0];
    for (var i = 1; i < splitedUrl.length; i++) {
        if (splitedUrl[i].toLowerCase() !== "index" &&
            splitedUrl[i].toLowerCase() !== "ui" &&
            splitedUrl[i].toLowerCase() !== "swagger" &&
            splitedUrl[i].toLowerCase() !== "login") {
            tUrl += splitedUrl[i] + "/";
        }
    }
    tUrl = tUrl.slice(0, -1);

    $("form#myFormId").submit(function () {
        var mydata = $("form#myFormId").serialize();
        debugger;
        console.log(mydata); // it's only for test
        $.ajax({
            type: "POST",
            url: tUrl + '/token',
            data: mydata + "&grant_type=password",
            success: function (data) {
                if (data.access_token !== undefined) {
                    sessionStorage.setItem("token", data.access_token);
                    sessionStorage.setItem("expires", data[".expires"]);
                    window.location.href = "/swagger/ui/index";
                }
            },
            error: function (xhr) {
                console.log(xhr);
            }
        });
        return false;
    });

});
After we finally finished the main authentication over the Swagger and only authenticated users can now access our API documentation, do we need all kinds of users to access our documentation? If the answer is NO, then we can restrict access to Swagger UI and the view of allowed operations.
To achieve this, we must provide operation schemes, where we can define whether the API method will be visible or not for the current user to the Swagger UI, for that purpose we must provide SwaggerOperation schemes. All this means that the Swagger UI approach for each API method will not be restricted to users who have roles specified in the Schemes, while the remaining user roles specified in the authorize attribute will have access to the execution of the method only and they will not be able to see the method in the Swagger UI.
[Authorize(Roles = "developer, normaluser")]
[SwaggerOperation(Schemes = new[] { "developer" })]
public IHttpActionResult Get(int id)
{
    return Ok("value " + id);
}
In order to find out the current roles of the user who accesses the documentation, we can create two classes that will be used in one particular controller. The SwaggerTagAttribute class will inherit from AuthorizeAttribute and will override the OnAuthorization method in order to take the current role of the user. The controller itself will be disconnected from the Swagger UI with a special attribute contained in one method.
public class SwaggerTagAttribute : AuthorizeAttribute
{
    public override void OnAuthorization(HttpActionContext actionContext)
    {
        var claimsIdentity = (ClaimsIdentity)HttpContext.Current.User.Identity;
        var claims = claimsIdentity.Claims;
        var roleClaimType = claimsIdentity.RoleClaimType;
        var roles = claims.Where(c => c.Type == roleClaimType).ToList();
        CurrentUserRoles.Roles = new List<string>();
        foreach (var claim in roles)
        {
           CurrentUserRoles.Roles.Add(claim.Value);
        }

    }
}

public class CurrentUserRoles
{
    public static List<string> Roles { get; set; }
}
[ApiExplorerSettings(IgnoreApi = true)]
[SwaggerTag]
public class SwaggerController : ApiController
{
// GET: Swagger
public string Get()
{
return "";
}
}This controller should also be called from the UI part of the documentation and for that purpose, we can change the code block that is responsible for whether the user has a valid authentication token.
var token = sessionStorage.getItem("token");
var expires = sessionStorage.getItem("expires") !== null ?
    new Date(sessionStorage.getItem("expires")) :
    new Date(Date.now() - 86400000);
var now = new Date();
if ((!(token)) || (expires < now)) {
    window.location.href = curl + "/ui" + "/login";
} else {
    $.ajax({
        type: "GET",
        url: getUrl.protocol + "//" + getUrl.host + "/api/Swagger",
        headers: { "Authorization": "Bearer " + token }
    });
    $('#input_apiKey').val(token);
}
The way of resolving access to part of the documentation can be performed by implementing the IDocumentFilter interface. We will register the new class in the configuration section for the Swagger specification. In this class, we check that the current role of the user is contained in each SwaggerOperation Schema for each method that may be of type GET, POST, PUT, DELETE, PATCH, OPTIONS, and HEAD. We can achieve this by checking all possible paths that are part of the API project. That way we extend the http or https access schemes to the level where we define which user’s parts of the API functionality have access to a specific part of the specification.
public class SwaggerAccessDocumentFilter : IDocumentFilter
{
    public void Apply(SwaggerDocument swaggerDoc, SchemaRegistry schemaRegistry, IApiExplorer apiExplorer)
    {
        foreach (var value in swaggerDoc.paths.Values)
        {
            value.delete = NullifyIfRestricted(value.delete);
            value.get = NullifyIfRestricted(value.get);
            value.head = NullifyIfRestricted(value.head);
            value.options = NullifyIfRestricted(value.options);
            value.patch = NullifyIfRestricted(value.patch);
            value.post = NullifyIfRestricted(value.post);
            value.put = NullifyIfRestricted(value.put);
        }
    }

    public Operation NullifyIfRestricted(Operation operation)
    {
        if (CurrentUserRoles.Roles == null)
        {
            return null;
        }
        if (operation != null &&
            operation.schemes != null &&
            !operation.schemes.All(s => CurrentUserRoles.Roles.Contains(s)))
        {
            return null;
        }

        return operation;
    }
}
The final configuration section for the Swagger specification should look like the following code:
public class SwaggerConfig
{
    public static void Register()
    {
        var thisAssembly = typeof(SwaggerConfig).Assembly;

        GlobalConfiguration.Configuration
			.EnableSwagger(c =>
			{
				c.SingleApiVersion("v1", "SwaggerSecurityDemo");
			    c.BasicAuth("basic").Description("Basic HTTP Authentication");
			    c.DocumentFilter<SwaggerAccessDocumentFilter>();
			}
			.EnableSwaggerUi(c =>
			{
				c.InjectJavaScript(thisAssembly, "SwaggerSecurityDemo.CustomSwagger.Auth.js");
				c.CustomAsset("index", thisAssembly, "SwaggerSecurityDemo.CustomSwagger.index.html");
				c.CustomAsset("login", thisAssembly, "SwaggerSecurityDemo.CustomSwagger.login.html");
				c.EnableApiKeySupport("apiKey", "header");
			});
	}
}
Whether Swagger password protection is the main goal or to protect Swagger UI with passwords, the ultimate goal is to secure your Swagger.